Using Jekyll And Github.io To Build And Host A Blog
by XiongJJ
For some reason I started to write this blog since last week (03/13) while I have just a little-little-little bit of website building experience. So, I’m intended to build the blog using markdown only (for me it is much more easier than building it from ground using html + css ). And the best solution so far I have found on the internet is to use Jekyll to compile and build the website and host it on Github Pages.
However, while it is easy to host your website on github as the git actions necessary were none other than add, commit and push, things don’t go easily on Jekyll side. I didn’t find any tutorial on the internet that was simple and concise enough, but tutorials that was written intently for complete beginners who don’t write any code before, or tutorials written with many super long paragraph explaining a simple action which the user don’t really need to know about.
After struggling with the tutorials described above, I decided to write an article to give a simple guide using Jekyll for other intermediate user who wants to start writing a blog/personal website but having few/without website building experience like me. This guide assumes you to already have the skills listed below:
- familiar with git and github repo
- familiar with markdown language
- basic shell command(not really needed if you works in Windows)
- basic package manager actions(JS npm, Python’s pip…)
- basic web knowledge(localhost, domain name…)
If you do not meet the requirements above, I’d suggest that you start from learning them separately. If you are a experienced programmer I believe they shouldn’t be problems to you.
Note: this guide was written in Ubuntu, but OSes don’t really matters here as you know how to install the necessary packages on different OS.
Installation
First, install git if you haven’t do so. Jekyll is a package(called ruby gems) written in Ruby, so run the commands below to install a full Ruby development environment and then Jekyll. You also need the gem bundler when building the site.
# On ubuntu
# Installing ruby development environment
$ sudo apt install ruby-full build-essential zlib1g-dev

# Then the gems
$ gem install jekyll bundler
Build a simple website and host on github
-
Create a repo on github.com, name it with this convention
[github-username].github.ioand do not initialize it with anything else including README.By naming your repo with the domain name XXX.github.io, this repo will be set up for the github-pages to serve content in your master branch automatically.
- After creating a repo, get the remote repo URL.
- Run commands below to create a new Jekyll blog instance, and push to the remove repository.
# create new blog with same name as your remote reposotory $ jekyll new [github-username].github.io $ cd [github-username].github.io # initialize the generated folder into a git repository $ git init $ git add . $ git commit -m "[commit message]" # add a remote $ git remote add origin [remote repo URL] $ git remote -v # push to github $ git push origin master - Now on your browser, enter
https://[username].github.ioas address and you should see your website hosted successfully. This is how the default post looks like when you clicked into it on the menu.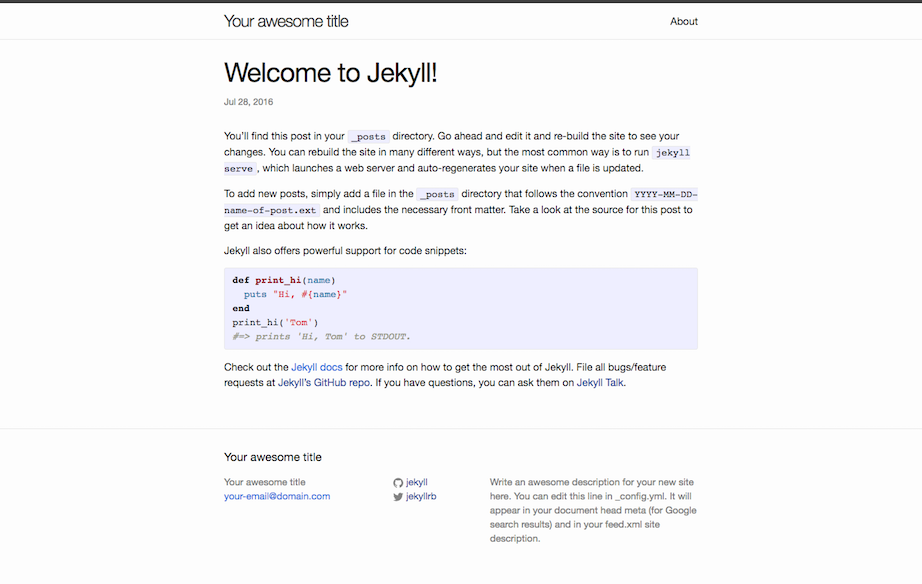
Working around with Jekyll
After you have successfully built and hosted your first blog, now it is time for you to tune the stuffs in the generated folder to customize your site. A Jekyll generated site can have the following files and folder (more can be added, depends). This guide will explain the files and folders one by one.
-- root_directory/
  -- 404.html
  -- about.md
  -- _config.yml
  -- Gemfile
  -- Gemfile.lock
  -- index.md
  -- _posts/
  -- _layouts/     # optional
  -- _draft/       # optional
  -- _site/        # generated when building sites offline
Before starting explaing what the folders and files act in Jekyll, it is important for you to know that how to compile and serve your site on localhost so that you can test your site offline before pushing to github. To build and serve your site, run the command:
# for first time building offline
$ bundle exec jekyll serve

# not first time, just testing new posts/layouts
$ jekyll serve
Running the command gives the below output:
Configuration file: /home/xiongjj/Desktop/krimson8.github.io/_config.yml
            Source: /home/xiongjj/Desktop/krimson8.github.io
       Destination: /home/xiongjj/Desktop/krimson8.github.io/_site
 Incremental build: disabled. Enable with --incremental
      Generating...
                    done in 0.367 seconds.
 Auto-regeneration: enabled for '/home/xiongjj/Desktop/krimson8.github.io'
    Server address: http://127.0.0.1:4000/
  Server running... press ctrl-c to stop.
Note: always pay attention to this output message because it will show the error encountered when building your site, somehow works like a compiler error message.
After this you should have a site running on localhost. Now I will go through and explain the other files and folders in the generated directory.
- 404.html
htmlandmarkdownfiles in the root directory are normally pages, and this is the default page for jekyll to use in case oferror 404. - about.md
htmlandmarkdownfiles in the root directory are normally pages. - _config.yml
The config file for jekyll to build up your site. The default one should be easy to understand. Some information will be used by Jekyll to apply on your website depend on your theme.
- Gemfile
bundlerwill download the necessary gem(s) necessary for jekyll to build your site, which they are listed in thisGemfile. - Gemfile.lock
A .lock file is generated the first time you run
bundle install. This file records down the version of each gem you used in your site, andbundlerwill download the gems with the appropriate version. This file shall be included in your repository in case you work in different computer and it is more stable to use the same version of gems for your site. - index.md
htmlandmarkdownfiles in the root directory are normally pages, and this is the home page which jekyll will serve. This is also the file you will want to customize to put the hyperlink to the other page (like about.md). - _posts/
This is the folder where you store all your regular posts for blog update/web page update.
- _draft/
This is the folder where you store your draft post. Can be optional. If you want to test and let jekyll to serve post in _draft/ run the command
jekyll serve --draftand then posts in _draft will be shown on theindexlist of posts. - _layouts/
This is the folder where the layout templates were stored. Some default layouts include
post,pageand etc. The templates are stored asmarkdownorhtmlfiles. - _site/
This is the folder where jekyll stores the compiled website and serve.
Writing a new post
There are a few rules to follow when composing new articles in markdown in Jekyll.
File naming
Firstly, you are encouraged to name your .markdown post in the following convention:
YYYY-MM-DD-Your-New-Post.markdown
For example, the file name for this post you are reading here is:
2019-03-20-Using-Jekyll-And-Github-Pages.markdown
Naming your files in this convention allow Jekyll to obtain time details and also the title to be shown.
Front matters
Every post/page written in markdown in Jekyll begins with lines of informations called front matters. I use this post’s front matter as example:
layout: post
title:  "Using Jekyll And Github.io To Build And Host A Blog"
date:   2019-03-20 23:00:00 +0800
author: XiongJJ
comments: true
categories: git web-technology
Notes:
- You can override your post’s title here instead of the title in the file name.
layoutinstucts Jekyll to apply the chosen templatepostto this post when rendering. Layout chosen here must be available in_layouts/or otherwise an error will occur.author,commentsandcategoriessection are needed by other functions which I will explain later.
After setting with the front matters, you are ready to write your post.
Publishing your new post
Any markdown files in the _posts/ folder will be served by Jekyll either locally or when you pushed to your github repo. So when you finished composing your post, just add, commit and push. Simple enough :D ?
Applying theme to your website
There are several ways to add theme to your website, I will not explain them in detail for it is a long story to tell.
Note: before applying theme to your website, check out the theme’s github repo, and look for the _layouts/ folder and see if there are the layouts you need. For example, some of the theme contains only a single layout, but not seperate layouts for post and page.
Gem based theme
They are ruby theme gems that can be installed directly to your site. Github official tutorial gave a nice explaination and steps to use the gem themes both locally and on github.io. The tutorial can be read here.
Non-gem based theme
This is what I used for my blog. The theme name is Centrarium by Ben Centra.
To use theme like this, just copy the file in the theme repo to your own github repo, and store your post into appropriate folders, then modify the other pages as well. After you have done modifying, push them up to your github and it should be served well.
author, comments and categories in the front matters are built-in functions provided by this theme. The author section enables post to show author name on each of them, comment section enables disqus on your website and categories acts like a tag while this theme supports categorizing post with tags.
For more information, kindly refer to the theme’s github repo. Different theme may provide different bonus functions, just pay attention to their _config.yml.
Last but not least…
You should be able to build a website/blog using the tools mentioned above. More advanced functions of Jekyll were available but not introduced here.
This is my first time writing a long guide like this article. I have tried to make it as simple as possible, however I might missed a few things crucial for this guide to work. So if you encountered any problems kindly leave a comment below and we can try to fix it together, for I don’t have much experience on this kind of stuff too. Also, if you spot any error here either grammatically (I’m not native English speaker) or technically please do let me know.
Subscribe via RSS